How To Easily Adjust Your Bike Brakes
13 March 2025
There are many reasons you’d want to adjust your bike brakes –
To replace brake pads/rotors
To stop them from squeaking
To stop them from pulling and rubbing
To tighten/loosen them
To clean the brakes and harder to reach areas of your bike
To maintain them
It's a good idea for cyclists to know how to adjust bike brakes in case you need to fix your bike brakes and, while all the moving parts can make it look intimidating, it’s not as complicated as it looks.
This article will teach you the basics of how to maintain, align and adjust your bike brakes.
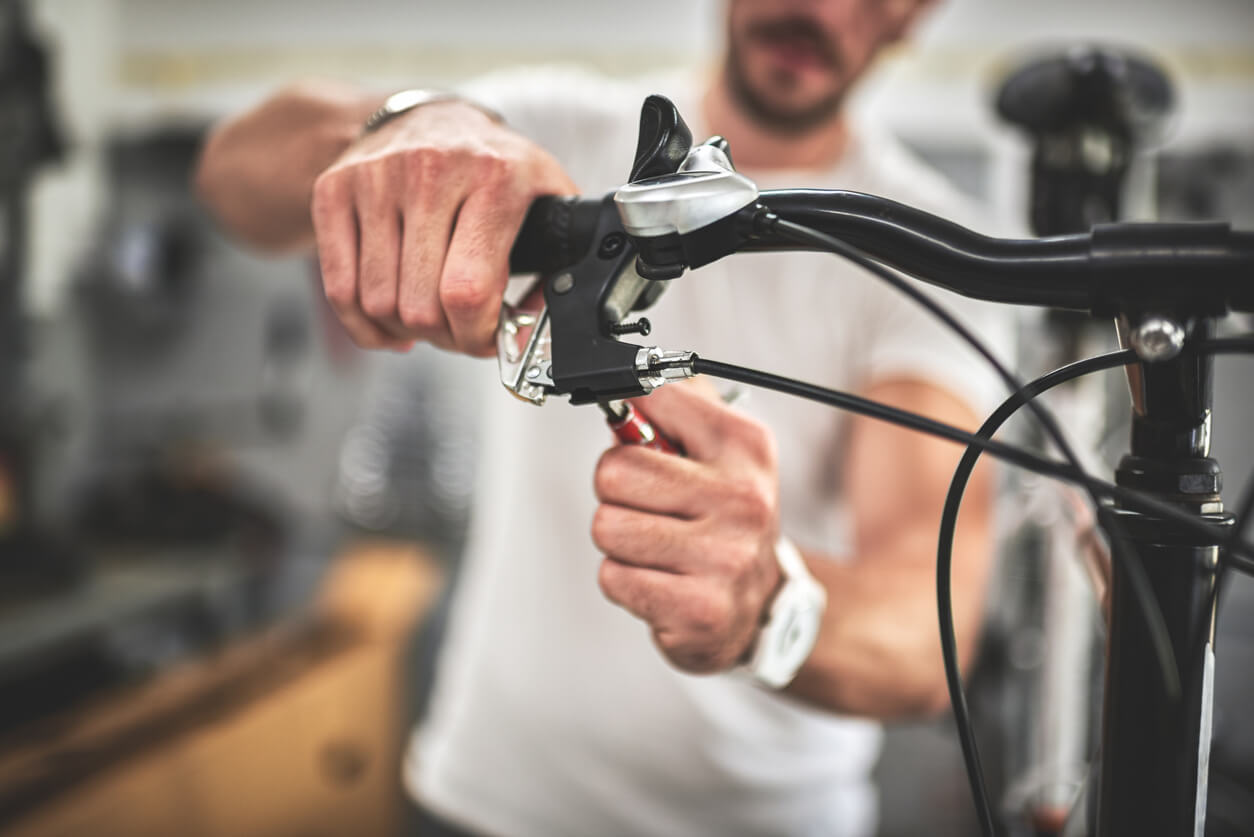
How to adjust your brake cables

There are two main points of adjustment on cable-based brakes like v brakes and mechanical disk brakes. One is at the caliper and the other is the barrel adjuster.
On v brakes, the caliper is the horseshoe-shaped device over your tyre that’s attached to the brake pads. On mechanical disk brakes, the caliper is the claw-looking device at the disk in the centre of your wheel. The barrel adjuster is the metal cuff on the brake cable at your brake lever.
If you find you have to pull hard on the brake lever to slow down, or it squeezes right into the handlebar, it’s likely your brake cable needs adjusting.
Pull the brake lever to judge how tight or loose your brakes are
The clearest giveaway that something is wrong with your brakes is if the brake lever is too tight or too loose.
If the lever touches the handlebars, the brake cable is too loose. If you can barely squeeze it at all, the cable is too tight. Ideally, the brake lever should squeeze 3-4cm before becoming difficult.
Tighten or loosen the barrel adjuster accordingly
After diagnosing whether your brake cable is too tight or too loose, you can make minor adjustments using the barrel adjuster. Tighten or loosen the barrel adjuster by turning it clockwise or anti-clockwise. This will increase or decrease tension in the cable.
Once you’ve tightened or loosened the barrel adjuster accordingly, give the brake lever another squeeze to see if it’s fixed the issue.
Top tip: Tightening or loosening the barrel adjuster is a quick and easy way to address braking issues if you’re out on a ride. Even if it doesn’t solve the problem, it might improve the situation long enough for you to get home safely and fix it properly.
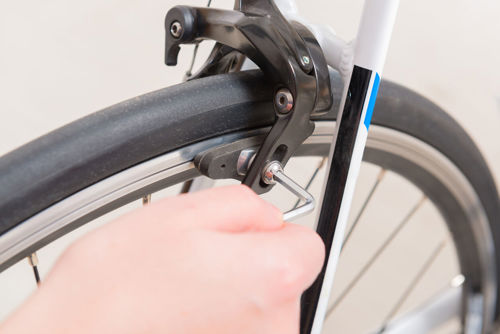
Loosen the bolt on the brake caliper to readjust
If the brake lever is still too tight or loose after correcting the barrel adjuster, the cable may be too tight or loose on the brake caliper.
Take your Allen key and loosen the cable from the caliper by turning it anticlockwise, taking care not to entirely unbolt it as you’ll find yourself having to reassemble the brake. See 1:25 – 1:33 of the above video for a visual demonstration.
Pull or release the brake cable through the caliper
Once the caliper bolt is loose enough, it should spring back away from the wheel and cable. From here, you should pull the cable outward to tighten the brake, or allow the cable to retract inwards to loosen it.
With v brakes, remember you want the brake pads not to touch the rim, but sit a few millimetres from it.
For disk brakes, the cable threads through a lever on the caliper that moves when you apply the brakes. When you tighten the cable, make sure the lever still has enough room to move and can’t reach back so far as to hit the caliper. If it does, your braking will be obstructed and the pads won’t reach the rotor.
Tighten the caliper bolt back up
When you’ve found the spot your brake pads sit comfortably over the rim and the cable is tight, screw the caliper bolt back up and give your brakes a squeeze.
If they’re still not quite right, it’s worth revisiting the barrel adjuster to make final tweaks to loosen or tighten the brakes.
How to adjust v brake pads
For v brakes, adjusting your brake pads goes hand in hand with adjusting your brake cable. After all, the time will come when you have to replace or adjust them.
If you feel your brakes pulling while you ride, they make an obnoxious screech when you apply them, or they’re not even on both sides, that time might be now. Here’s what to do.
Check your brake pads
Brake pad wear is one of the most common reasons for misalignment and poor brake traction, so it’s a good place to start when trying to diagnose an issue.
If the brake pad has worn past the wear line, or unevenly, it’s time to buy new brake pads.
Top tip: We recommend going for black or natural coloured brake pads, as any artificial colours in the rubber compound can cause that horrible honking sound whenever you pull your brake.
Pull the brake lever to see where your brakes need adjusting
Once your brakes are properly aligned, both brake pads will squeeze evenly against the rim of your wheel when you pull the brake lever.
The brake pads should squeeze on the centre of the rim, without touching the tyre or protruding over the lip of the rim. You want your brakes to achieve maximum surface contact with the rim of your wheel.
If one side of the brake squeezes more loosely than the other, overlaps the rim, or only one side squeezes at all, this will tell you where the misalignment is coming from.
Loosen the bolts holding the brake pads in place
Once you’ve identified the area that needs adjusting, loosen the bolt on the first brake pad with an Allen key. To adjust one, you might need to adjust the other, so loosen the other side too.
It’s important not to loosen them too far. If you do this, the pads will slip out of the holder and all the bolts and washers will trickle down to the ground. Just loosen the bolt enough to move the brake pad forwards and backwards about 5mm and slightly up and down in the holder. This should be enough to align your brakes properly.
Top tip: If you need new brake pads, you’ll need to wind out the brake pads completely to replace them with new ones. Just try to remember the order of any washers and bolts on the stem, so you can replicate this when attaching new pads.
Move your brake pads into the correct position
Now, you can adjust where your brakes sit on your wheel. If they were too loose before, close the gap between the pads and rim by pushing them closer. If they were too tight, position them slightly further from the rim than where you had them before.
Remember to also align the pads with the arc of the wheel, ensuring they sit flush and don’t rub against the tyre or overlap on the rim’s inner edges.
The ideal position for your pads is a few millimetres out from the rim. The shorter the distance between the brake pads and rim, the more responsive your brakes will be when you pull the lever. Just make sure the pads aren’t actually touching the rim before you pull the lever.
Tighten your brake pad bolts back up
Once you’re happy with the placement of your pads, tighten the bolts back up with the Allen key. Be careful not to pull your brakes out of alignment as you tighten them back up.
Also, try to balance how much you’ve tightened the bolt on each side. This will ensure each brake pad is as responsive as the other and they both work evenly, at once.
How to adjust your disk brake pads
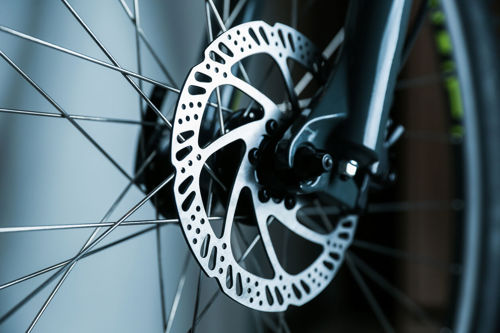
Just like v brakes, disk brakes have two pads that squeeze on a moving component of the wheel to slow you down when you pull the brake lever. With disk brakes, this is the metal disk at the centre of your wheel, called the rotor.
Disk brake pads can wear down and become misaligned with the rotor. Worse still, worn brake pads can be dangerous and aren’t as easy to notice as those on v brakes, so it’s important to maintain them from time to time. Here’s how.
Stand your bike upside down on a flat surface
Part of the process of adjusting your brake rotor is to spin the wheel. So, to prepare for that, you’ll want to stand the bike upside down, resting on its handlebars and saddle.
An alternative is to have a friend simply lift the bike when it’s time to spin the wheel, or to invest in a bike stand.
A bike stand might be a good idea if you plan on doing your own maintenance in future, anyway.
Check the alignment of the rotor
If you look down your wheel, you should see that the rotor sits in a gap inside the brake caliper, between two pads. If the rotor is unevenly spaced on either side, the caliper needs adjusting.
From here, it’s possible that nothing seems wrong. But, sometimes rotors can be become damaged or bent and only give it away once the wheel is moving. So, spin the wheel.
The rotor moves with the wheel so if it’s bent, it should wiggle from side to side as it rotates. In most cases this means you need a new rotor, but it is possible to true the rotor with a special tool that essentially allows you to bend it back into shape.
You’ll know you’ve managed to correct the rotor if there’s no lateral movement when you spin the wheel.
Loosen your disk brake bolts
If your rotor appears to be closer to one brake pad than the other, you’ll need to bring the caliper back into alignment. To resolve this, you first need to loosen the bolts at the top and bottom of the caliper.
Make sure not to loosen them the whole way. You want just enough slack in their fittings that they can move around slightly without falling apart.
Squeeze the brake and tighten the bolts
Once your brake caliper is loose, spin the wheel and then tightly pull the brake lever.
The brake caliper will grip against the rotor, which will bring both pads into alignment with each other.
With the brake still held, tighten the bolts back up.
Release the brake lever and test
Once you let go of the brake lever, it should sit in the middle of the two brake pads inside the caliper. You should be able to see it, but test this by spinning the wheel to ensure there’s no lateral movement and the caliper stays in place.
If they’re not quite equally spaced, make smaller adjustments by loosening one bolt at a time and repositioning the caliper until they are.
Stay safe while cycling
Knowing how to adjust your bike brakes will help you safeguard your bike in the long run. Another way you can protect it is by getting cycling insurance.
Our specialist cycling insurance means you’ll be covered against injuries and your bike and accessories will be covered against damage, theft, or loss – whether you’re out riding or at home.
Please note the information provided on this page should not be taken as advice and has been written as a matter of opinion. For more on insurance cover and policy wording, see our homepage.